Price:
You Build: AU $285
If we build for you: add AU $300
Contents:
- So What Does “Kit A” Contain?
- What We Have Done To Prepare The 3D Lightweight Flyer For You
- What You Will Need To Transfer From Your Dragon Force
- What To Do To Get Your 3d Lightweight Flyer Into The Water And Racing
- So What Does “Kit A” Contain?
You own a Dragon Force and have started to think you could somehow get more performance out of your yacht. But don’t want to go to the expense of a whole new yacht and would like to use the fittings from the DF. Well the answer is here.
- Purchase a 3D Lightweight Flyer kit for your Dragon Force
- Put the kit together over a few days
- Swap some key items from the Dragon Force including rig, sails, keel, bulb and rudder.
- Go racing with a superior performer that resulted from extensive research from 3D Printed Radio Yachts.
The Dragon Force Conversion Kit A is uniquely designed for those who currently own an RG65 Dragon Force, and with the least amount of fuss, want to convert to a superior performing yacht.

Image 1: Kit A, showing the bits and pieces supplied to make a successful Dragon Force converted racing yacht. You will be transferring the keel, rudder and bulb.

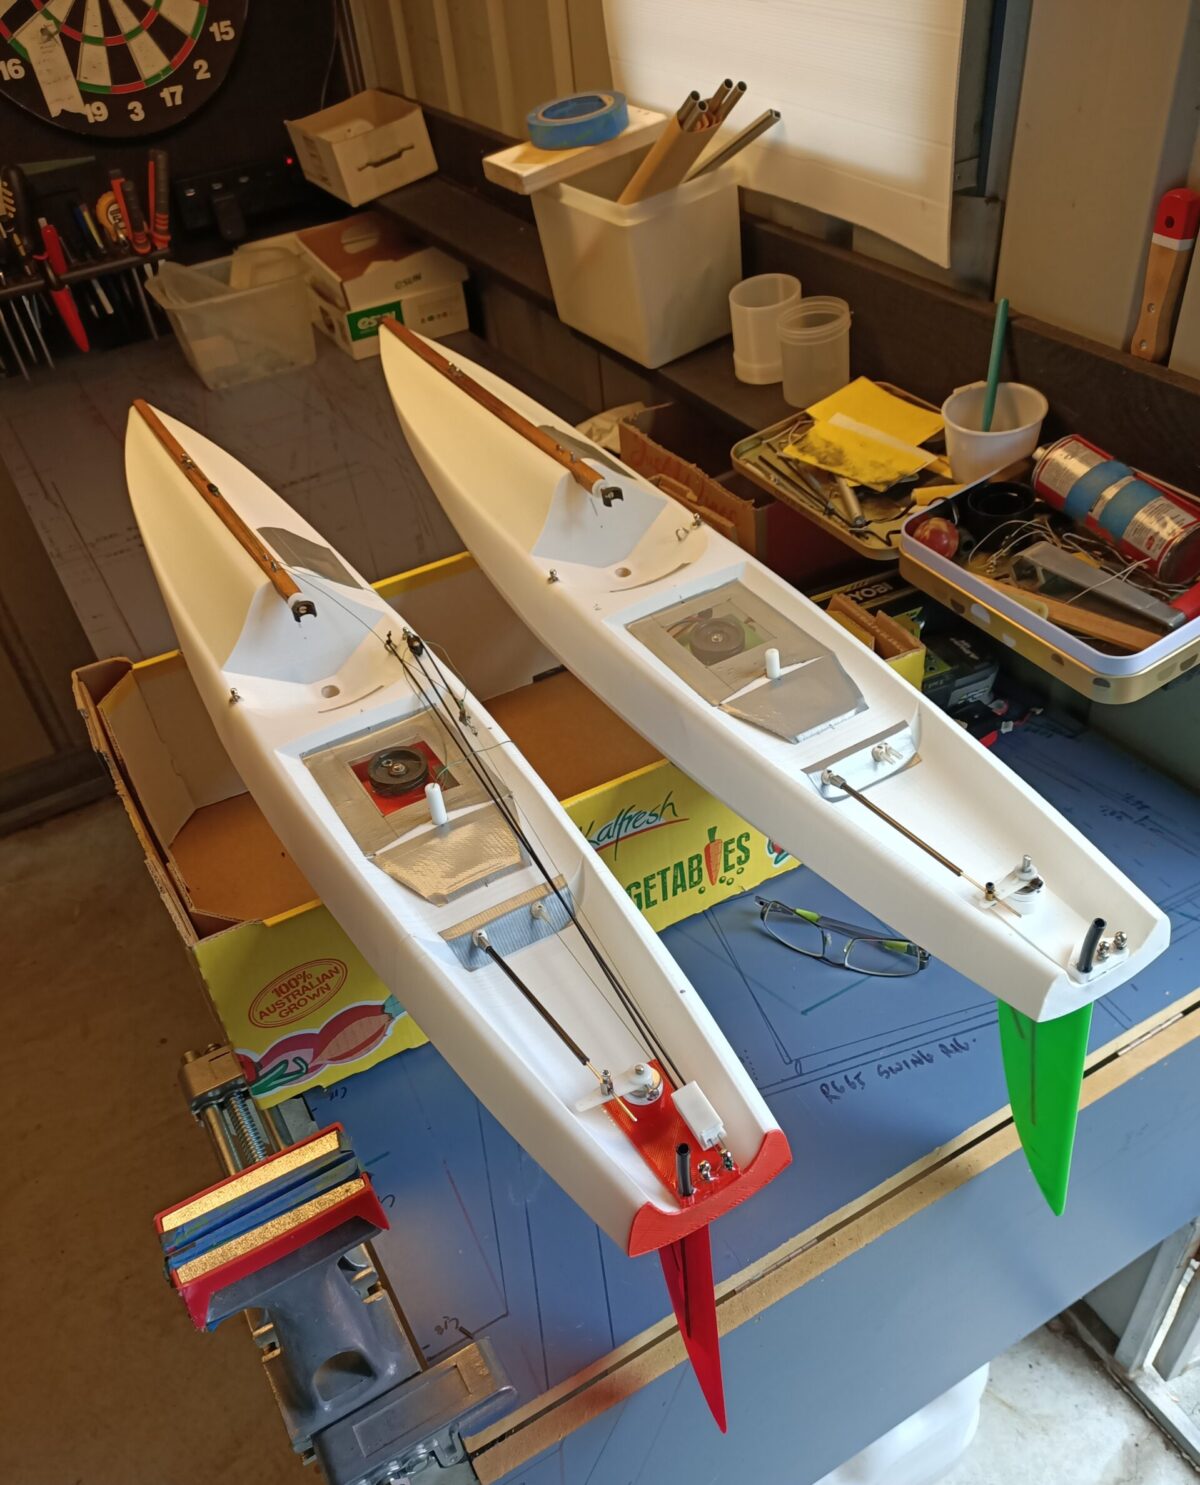
Image 2: A completed Kit A, similar to what you will be doing. Some items will need to be transferred from your RG65 Dragon Force.

Image 3: Deck and sheet layout, using many of the Dragon Force fittings.
The “Self Build Manual” contains more than enough detail and images for you to build this partially prepared hull. Then slip on your Dragon Force gear and go have some nice fast fun.
Editors note:
This conversion is what I did when I first fell into the RG65 class. Because there were lots of Dragon Forces at the club, that is what I purchased. They are a great machine with good solid fittings but it very quickly became obvious that there was an option to step up to the performance of the specially designed and expensive RG65s that were winning all the races.
So, when I started to research the 3D process, all the earliest prototypes were simply 3D printed hulls with the Dragon Force running gear. Then I built myself a basic luff pocket sail set and went racing with the early and very rough prototypes. The first major regatta I entered was a 2nd place and the second was a 1st. I have to admit, I was very encouraged.
Since then, the research and collaboration with Bill Hagerup in the US and Craig Smith in Australia has lead on to a string of prototypes resulting in this current “3D Lightweight Flyer” I called “Glass Lady”. It has put a grin on my face since first launched: beautifully balanced, lightweight, strong and slippery.
I have had many inquiries as to how to get hold of one of these 3D Lightweight Flyers”. Hence, we decided to supply the self build kits for you. Now you too have the chance to convert your Dragon Force with Kit A, at a very reasonable price, using your Dragon Force bits and pieces to complete the boat.
Selwyn Holland
- What We Have Done To Prepare The 3D Lightweight Flyer For You
Along with supplying the items and “Self Build Manual” needed to complete your 3D Lightweight Flyer, we also partially prepare the hull ready for you to finish.
- We epoxy coat the inside of the hull with a special formula to add that bit of extra rigidity.
- We cut the main hatch opening to the exact size so all you have to do is epoxy the hatch surround around the edge of the cut to produce a lovely professional finish.
- We cut the battery hatch opening in the foredeck ready for you to epoxy the surround on and then attach the battery shelf at your preferred angle.
- We cut the rudder support opening ready for you to slip the Stern Plate into place. This helps with precision alignment of the rudder and the keel.
- We cut the keel slot in the base of the hull ready for the keel box and keel alignment.
- And we prepare a bung hole ready for you to transfer the Dragon Force rubber bung.
So you want your 3D Light Weight Flyer built for you? No problem, we have a master craftsman for the job and the fee for hull completion is an additional AU $300
As you can see, a lot of the “heavy lifting” has already been done for you. We really did work very hard to make sure that these beautiful yachts could be easily and quickly constructed in just a few days. Then go racing.
- What You Will Need To Transfer From Your Dragon Force
Because you will be updating your Dragon Force yacht to your new 3D Lightweight Flyer, you will need to transfer some things from the Dragon Force to finish your hull ready for racing. It is also recommended you replace some items as detailed below.
This is all done after you have completed the 3D Lightweight Flyer under the instructions from the “Self Build Manual”.
- Take the eyelet screws from the Dragon Force hull and use them to complete your sheeting. You may want to change the configuration from the Dragon Force dimensions. Having done this a few times myself whilst producing prototypes, I simply copied the Dragon Force positions and the boat was nicely balanced.
- I would recommend getting yourself quality micro servos for the winch and rudder. I use the same ones for both. You will need to cut the slots in the holding shelf for the size you want to put in. A Dremel or similar modelling machine for drilling and cutting would be a very good investment if you don’t already have one.
- It is also recommended that you use a 6V LiFe battery to power your Yacht to save weight and size. See the “Self Build Manual” for details.
- Transfer the keel and bulb. Just slot the DF keel straight into the new keel box.
- Transfer the rudder. It should fit snugly into the rudder support housing at the stern plate.
- Transfer the rubber bung to the pre-prepared bung hole.
- Transfer the rigs and sails.
The Dragon Force have a number of very good parts and ideas that can be used in your conversion. This keeps the price and complexity down for you and yet gives you a beautifully performing boat to give those fast guys a scare.
- What To Do To Get Your 3d Lightweight Flyer Into The Water And Racing
A wise person once said….
“When All Else Fails, Follow The Instructions”
Yes, follow the instructions in the “Self Build Manual”.
Please note:
- The sheeting system will be completely up to you. We have seen so many different ways of doing this that we decided to suggest a method but leave it up to you. If you decide to follow the suggested system then you will need to source a couple of items to finish it: a deck mounted sheet return (see image) and a single pulley (Hales micro pulleys are very good, see image)

Image 4: Suggested sheeting deck return and Dragon Force rudder swivel

Image 5: Sheet deck return and Hales Micro pulley
- The electronic control system is also up to you. You could use the supplied Dragon Force electronics or take the opportunity to completely swap over to a quality 2.4GHz system. There are plenty of quality systems now at great value.
- The rudder pushrod and swivel system from the servo will also be up to you. We suggest sourcing the Dragon Force version (see image 4) or any generic version from radio yachting supply shops. A basic, no fuss but effective version can be seen in the deck layout image above and it is also described in the “Self Build Manual”.
- Have the following materials and tools ready:
- A small supply of quality epoxy glue
- A non brittle “superglue”
- A quality model cutting/drilling system like Dremel
- Basic tools
You have many options to do your “special thing” on these “3D Lightweight Flyers”. Or, you can simply follow the formula in the “Self Build Manual”. Either way, the yacht is easy to put together and has many flexible variations for those of you who can’t help themselves and want to “customise” their special yacht.