“3D Printing: An Emerging Parallel Universe Of Design And Construction For The Radio Controlled Yachting Community”
Article 1. Introducing 3D Printing
Author: Selwyn Holland
Designs: Bill Hagerup, Craig Smith
Have I got your attention?


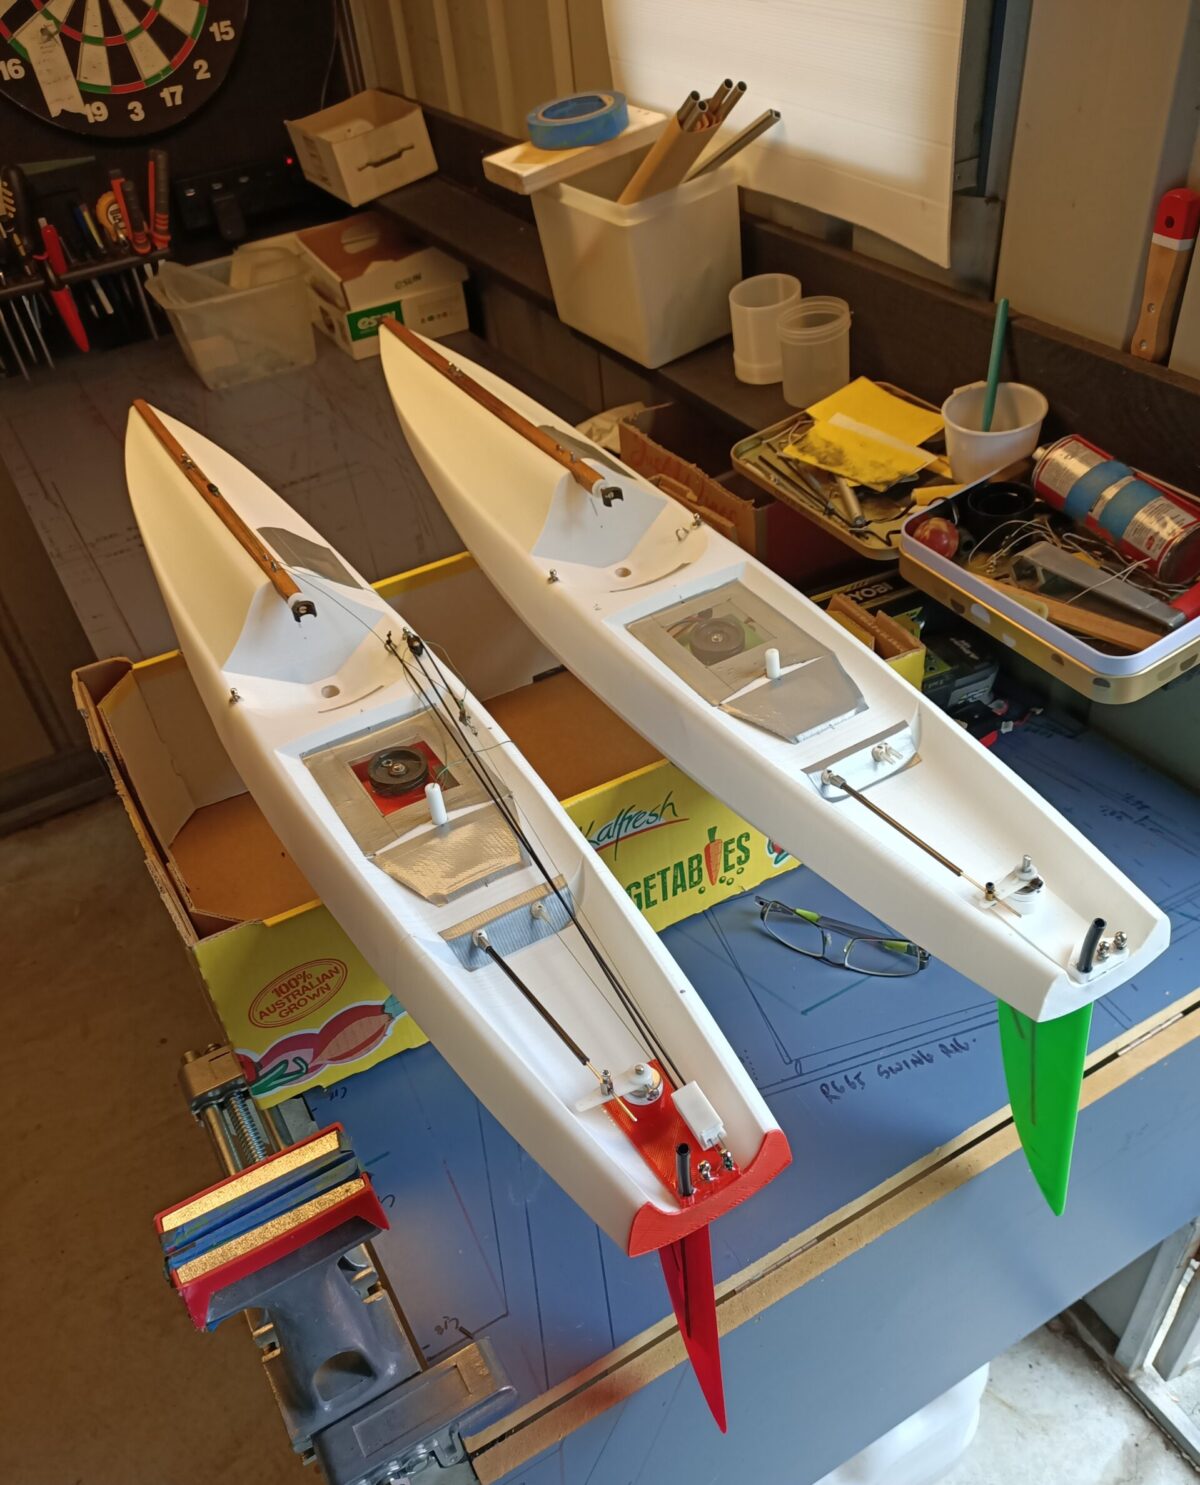
Figure 1 and 2. Two RG65s called “The Green Machine” and “Mr Orange”, all internal fittings and hulls have been 3-D printed (Designs courtesy of Craig Smith and Bill Hagerup)
I am starting to come to the opinion that the opportunities offered by this emerging technology may be as significant as the development of early radio control for our beautiful sport. The original radio sets, over time, evolved into the current crop of 2.4 GHz, ultra reliable and excellent value sets we use today.
3D printing is in that early stage right now, but even with the current technology an amateur builder with a desire to learn a few new tricks can quickly bring themselves up to speed to produce at the very least “bits and pieces” of their own design for their RC Yachts. And yes, it is also possible to print out complete, very accurate yacht hulls as well, but they are a bit trickier. More on that in future articles.

Figure 3. I call this “The Family Photo”. This journey will be limited mostly by your imagination. Most of what you see here has been printed from an amateur 3D printer. (Footy design courtesy of Bill Hagerup)
Like all good journey’s, they start with the first step. This series has been set up to start a progression of learning over time to evolve your thinking and put you on track to produce an amazing range of items. It is all basically limited by your imagination and a bit of experience at this stage.
At the outset, I would like to say that everything I have learnt has been purposely centred around the Radio Yachting community and obviously my own sailing equipment needs and ideas. Out in the other world, there are all sorts of new industrial processes being developed right now to use 3D printing in anything from restoring dashboards on rare automobiles to making gadgets in the International Space Station. There is a quiet but very significant swing in the paradigm of how things are to be built in the future.
But now let’s focus on you and what this can do for your sport. I am going to assume that you can operate a computer and understand how to construct basic things in and around radio yachts. Assuming this basic knowledge, let me explain how 3D technology works and what you can achieve fairly quickly.
What Is 3D Printing?
If you want a neat “hands on” idea of how all this works, grab a tube of toothpaste from the bathroom and try squeezing it out into some shape that makes sense, like a cube. A lot of fun, you may not be popular if you leave the inevitable mess behind, but that is basically how the current most common machines work.
Figure 4 graphically illustrates this “toothpaste effect”. All 3D items made today are simply a long melted trail of thermoplastic twirled around and around until the item is made. Modern software and computers make this process highly accurate and fast.

Figure 4. “The tangle”: this is what happens if you don’t get the print started right and go out for the afternoon. This was supposed to be an IOM keel box.
The Machines.
There are two basic types of machine commonly used today. These can summarised into two types :
- Moving head and base.
- Moving arms like a giant spider

Figure 5. Displays a moving head and base version. Note the thermoplastic feedline from the top.
I have purposely not promoted different machines because I am in no way an expert in this area. There are plenty of YouTube videos critiquing the various machines and worth some time to view these before purchasing. Make sure you can use 1.75mm filament with it and you are not stuck using only their materials.
A Warning. If you are tempted to go out and get a cheap machine offered at one of the discount houses, be careful. You may be disappointed, while you don’t need an expensive machine, you should get one that works for your budget but not an “el cheapo” please. You should think about starting with a good budget one and then over time step up to those machines that offer you more flexibility and accuracy.
I purposely purchased one that was solid, not cheap and had a reasonable volume to build things into.
Just remember that the current machines all do basically the same thing. But, some do it a lot better than others.
The Building Materials.
I use the most commonly available material and it works very well. Basically it is a 300m long piece of fishing line, 1.75mm in diameter and comes in a staggering variety of materials and colours all based on the heated nozzle extrusion process.
I would suggest you start with the PLA series of filaments. Trust me, I have done over 100 tests on materials and I keep coming back to the PLA thermal plastic for the RC yacht bits and pieces. More on this in future articles.

Figure 6. How many varieties do you want? You can even use a transparent material to make your boat out of to sneak up on your opponents.
What “Bits and Pieces” Can I Make With An Amateur Machine?
The key is to start small and expand up from there. I started making mast head swivels for the 10R and small boom and slider sections for my RG65s. Plus a couple of picture frames, a cup holder, a tube, a mobile phone protector, keel box, mast vang, rudder support, rudders and on it went. It is amazing what can actually be made and how easy and fast it is when you understand the basics. I have often thought of an idea and had the “gadget” in my hand within the hour. Very neat and all in my shed I fondly call “The Sail Loft”.

Figure 6. You are only a few basic steps away from building your own “gadgets”.
What Can I Do Right Now To Get Started?
As suggested earlier, it would be a good idea if you watch some YouTube Videos on the subject and then find someone who has a machine and go see what they do. Otherwise this is all going to sound a bit confusing as you get more and more information in the coming articles. One of my closest friends was wondering what I was doing and I tried to explain it to him standing on the footpath one day. I realised very quickly I was losing him, so invited him in for a demonstration. He is an engineer and honestly thought it was some sort of fancy paper printer. There was a big “wow can you do that?” factor as it emerged in his mind as to what this weird new technology can actually do.
Here is an idea.
Why not start sharing expertise and ideas and purchase a Club Printer. Put a couple of keen people in charge, find someone who has experience in 3D printing, pool your monetary resources and expertise.
To be honest this is how I started. Brian Dill kept bringing bits to the club to show us and then lent me his first machine. He happily followed this up with a visit to my place to get me started. This really sparked my interest … the rest is now history. We currently have 4 machines within the club and another one on the way. Exciting times.
What Can You Expect In Upcoming Articles?
Upcoming articles will firstly lay out the steps needed to make accurate and nicely finished purpose built “bits and pieces” for your boats. Subsequent articles will go into the greater detail of material research and making bigger things. This introductory article purposely lacked exact detail and was purely designed to get you thinking about maybe, possibly you also could make bits and pieces for yourself.
So, if you are interested in participating in this journey, do some research, avoid the cheap machines and most importantly…enjoy the learning curve.
End of article