History trail…. the mess and the success.
This page is a time line showing some of the discoveries and tears during this amazing journey.
It is hard to believe that this project has gone from this rough old jalopy originally:

To this stallion in more recent times:

The first image was a collaboration between Craig Smith in terms of preparing the design, Brian Dill printing it and Selwyn Holland gluing and hoping it would at least float the first time.
The running gear (keel, rudder, bulb and rig) was borrowed straight off a Dragon Force. Easy and simply to get in the water.
It actually sailed very well but was a bit heavy and not enough bouyancy at the front.
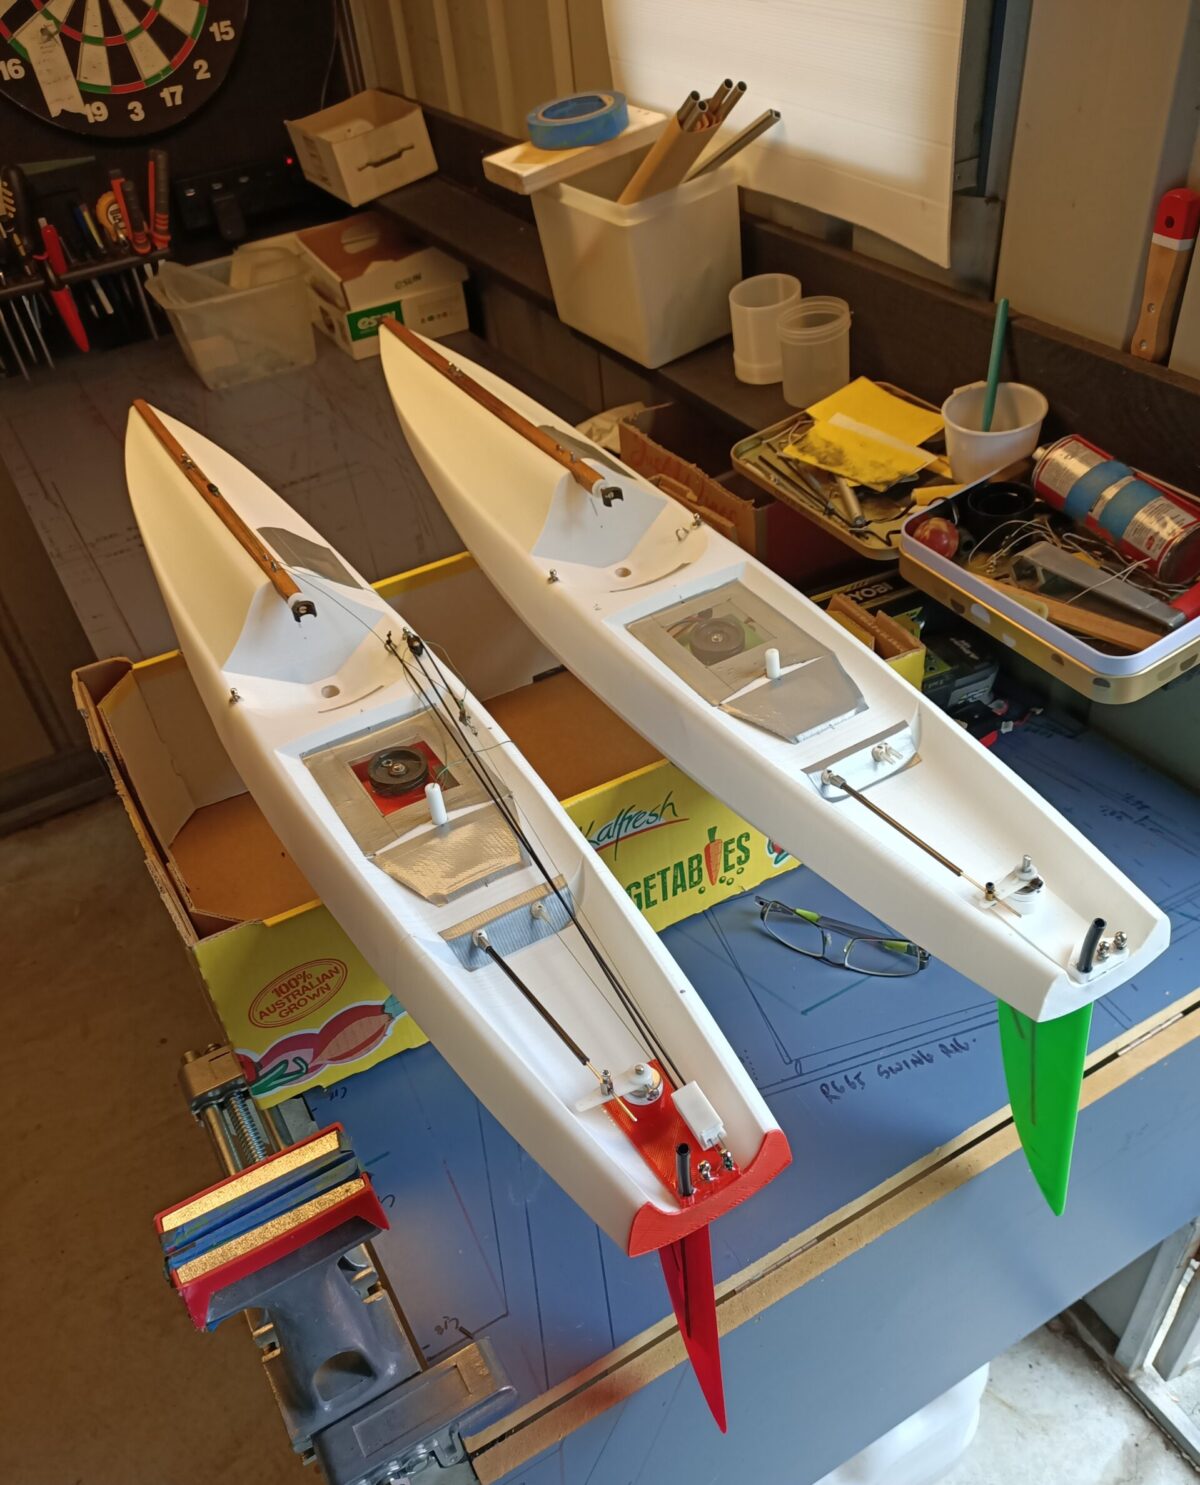
With a lot of water under the bridge since then and a few more prototypes, this next RG 65 called “The Shrink” is a collaboration between Bill Hagerup in the USA and myself (Selwyn Holland) in Australia. This is an absolute gem: rigid, lightweight and fast. The mass comes in at less than 1000g (actually 965g) and with the pocket luff rig is easily keeping up with the swing rigs at our club.
Almost everything from the bulb to the deck is 3d printed. Yes, even a very efficient bulb is VERY easy to make, the details are elsewhere. The rig is still from a Dragon Force and with my sails seems nice and efficient.
Following is the first prototype, being tested and sailed in Australia. The current model (orange above) has a slight update allowing it to take a swing rig as well.


“The Shrink” hull design Bill Hagerup, printing Selwyn Holland
Persistance, collaboration and research have been the key here. Elsewhere on this site you can read about some of the mistakes, research, highlights and disappointments on the way. We wish there had been a “guru” of 3d printing on the mountain to go to every now and then but alas, not.
Hopefully this site and all it contains will help budding 3d RC yacht nuts understand the process quickly and have a smoother pathway to this very exciting and quickly maturing new technology. It is just waiting for you to grab it with both hands.
Go and dream up a design and turn it into reality. It could take you less than a week from thought to racing. This process is seriously that good.
So what happened in between? It wasn’t all smooth sailing.
The first lesson learnt was that things can get a bit messy and uncertain at times, especially when boundaries are being pushed.


Another Birds Nest. This was supposed to be a keel box.
In spite of these and many more disasters, lessons were learnt and pointed us in a direction of research and boat building which has been very productive since.
It slowly became very obvious that these needed to be sorted out as soon as possible:
- Thinner Hulls. There was a need to find a way to get the hulls thinner and yet stronger. Current hull thicknesses range from 0.37 mm to 0.60 mm depending on what is needed and the class of yacht being printed.
- Smoother Hulls. I don’t know about you but I don’t like spending my life sanding down things that could be smoother from the start. This was the biggest part of the research and ended up requiring several hundred (yes, over 300) tests. There were lots of dead ends, but currently the hulls are lovely and smooth straight off the printer and can be “glossed up’ easily if the owner wants that look in the mirror finish. We are well within the smoothness to satisfy the Reynold numbers for drag. It was long and tedious but a load of fun.
- Waterproofing. The thermoplastic mainly used is the one most commonly used for 3d printing. It is PLA and is slightly porous to water even when well bonded. So a special epoxy coating has been developed to apply a lovely finish and also completely waterproof the hull. The coating also adds a tad more rigidity to the hull for extra strength.
- Mass of the parts. The PLA is about 1.3 times the density of water so there needed to be some lightening up of the objects when printing. Some research went into the perfect balance of plastic infill and the strength needed by the part. This reduced the mass to less than 40% of the original solid mass. This lower mass is important of course, the smaller the class. The needs for a Marblehead would be somewhat different to a Footy.
- Other areas of investigation included:
Materials (thermoplastics) There is an increasing range of materials, blends of materials and downright weird stuff coming on the market. The most promising ones are all being looked at.

Best way to build objects Currently we have a number of volunteers who have taken complete 3D printed kits and are working out better ways of putting these yachts together. Initial results have been very interesting and show just how lateral thinking and innovative people can be. These methods will appear in future articles.
Critical angles of printing (printers don’t like printing across open space because of gravity)

Colours and their effects on printing. For instance, we have discovered that there is a noticeable difference between say lime green and charcoal PLA colours on the temperature needed for printing and the layering height to get good adhesion between the layers. They both produce a fine product but need to be treated slightly differently.
Building ultra small objects We have managed to produce tiny little gadgets for our yachts. Small and accurate round holes are also possible. An interesting exercise.
And lots more, I think you probably get the idea. This really is a fresh, green field to work in. A very exciting, brand new technology that we predict will revolutionise how RC yachts are produced in our beautiful sport.
Author: Selwyn Holland